Here comes a list of steps to quickly configure your Node.js application server
Today, DigitalOcean remains a powerful tool regarding its services and prices. It provides servers with great performance and additional add-ons. DigitalOcean is a great hosting service for any businesses and developers, delivering a simple interface and excellent customer support for web development.
Sometimes, we need to quickly set up a Node.js server with PostgreSQL (as a sample ecosystem) to try out an idea or quickly start development. Every time, you have to google settings and commands that you don’t use so often in everyday life. Moreover, you can easily overlook an essential thing because setting up a server requires understanding many aspects of administration and programming.
I’ve gone through this myself, and today, I’ve decided to help you out with this task. For this reason, I’ve compiled a list of steps and tips that will help you quickly configure your server to start with Node.js application development. Once again, I will make a reservation that this is a basic list intended only for the configuration you can start with.
List of Steps to Quickly Configure Your Node.js Application Server
Getting Started
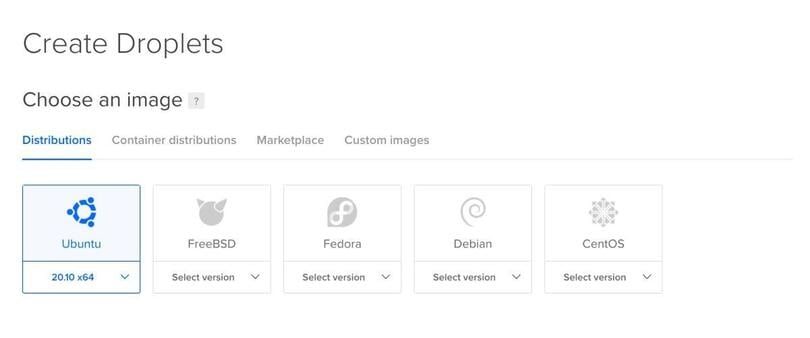
First, we need to make a droplet without presets on Ubuntu 20.10 and buy a domain. You’ll turn to the Create Droplets page, where you’ll get several configuration options before building a new server.
You also need to have access from your local machine to this droplet by SSH. A reasonably detailed section of the documentation on the DigitalOceans site will help us with this.
The setup will only take 8 steps to install Node.js, PostgreSQL, and other tools on our DigitalOcean node server. The final chord in our work will be deploying our Node.js app to DigitalOcean.
This completes the preparatory work. Now, let’s start setting up.
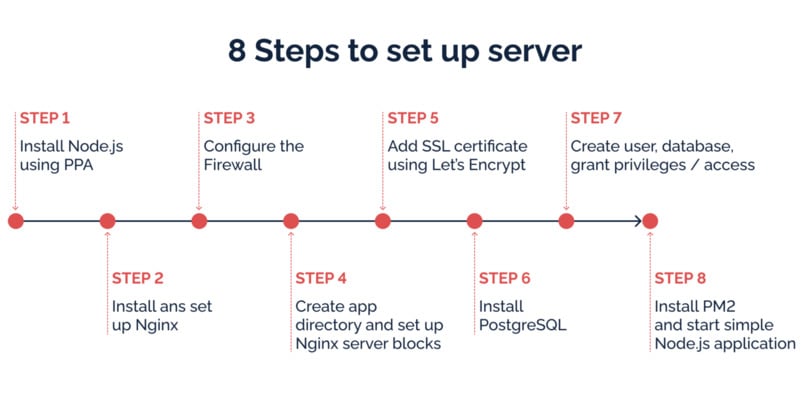
Step 1. Install Node.js on DigitalOcean Server Using PPA
On the DigitalOcean server, there’s no need to switch node.js versions often, and therefore we install the node of the version we need using a personal package archive.
Step 2. Install and Set up Nginx
We’ll use Nginx to deliver static files. It’s unwise to force your application to do this, right? Also, a little later, we’ll configure proxying.
We can check with the systemd init system to make sure the service is running by typing:
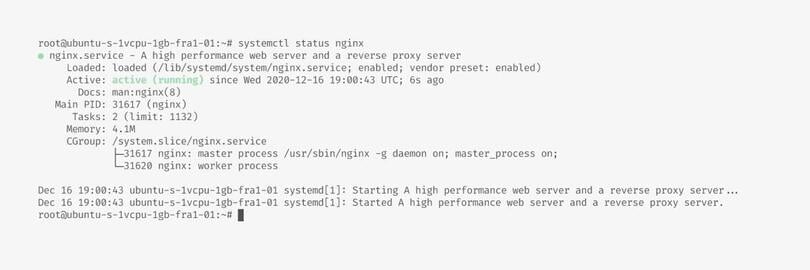
Everything is great if you see about the same as in the image above. So, we can continue.
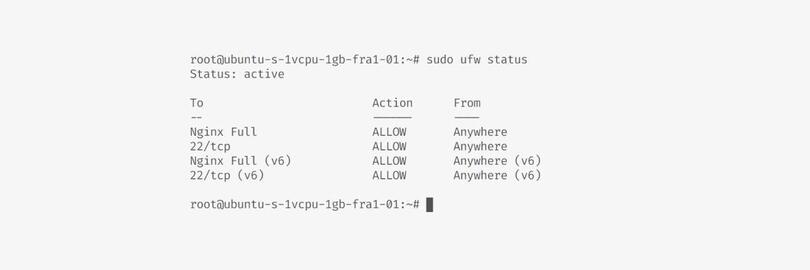
Step 3. Configure the Firewall
DigitalOcean uses cloud firewalls for blocking all traffic that isn’t explicitly permitted by a rule. We need to add special rules for the newly installed Nginx. Otherwise, nothing will work.
It’s crucial to add the rules first, and only then — enable firewalls. Otherwise, your current SSH connection may be interrupted, and you’ll have to restore access through the console from the web interface, which isn’t very convenient.
We won’t specifically open the port on which the database will be located. A little bit of ninja security, and you can get access through the SSH, which we have already configured.
You can verify the change by typing:
Step 4. Create an App Directory and Set up Nginx Server Blocks
A small remark: to work with the domain, you need to write down the IP address of your droplet in the domain DNS. After some time, these changes will be applied, and your domain will redirect to your server.
Create a folder for your project in /var/www
This is because, for some other directories, we’ll have problems with access rights, and we don’t want to solve them now. Therefore, we leave the default value and move on.
Create a new server block configuration:
This is a sample of settings just to see if everything works:
Then create a symlink from sites-available directory to sites-enabled directory:
We need to get rid of the default settings and for this, we will apply little ninja tactics:
Next, test to make sure that there are no syntax errors in any of your Nginx files:
If no problems were found, restart Nginx to enable your changes. Right now, we can make sure everything is working by simply typing the IP address of your server. Excellent. We are moving right along.
Step 5. Add SSL Certificate Using Let’s Encrypt
Install Certbot and its Nginx plugin with apt:
Obtain an SSL Certificate:
Then, we just follow the instructions and provide the information that is needed for the certificate. Certbot will correct the Nginx configuration for us so that everything works through https. Nothing complicated.
And the last thing we need to do is verifying Certbot auto-renewal:
Step 6. Install PostgreSQL
Run the following command to install PostgreSQL on the DigitalOcean server:
We can play with the database settings for our specific server configuration. For this purpose, you can use the online tool named PGTune.
Step 7. Create User, Database, Grant Privileges/Access
Switch to postgres user and enter the Postgres terminal:
Create a database and a user:
Grant privileges on the database to the user:
Now, we’ll try to access the database from your computer. I’m using TablePlus, and the connection setup screen looks like this:

Step 8. Install PM2 and Start a Simple Node.js Application
We need to install something to monitor your Node.js application, to restart it when the droplet reboots, and so on. PM2 is perfect for this. But this is only about app monitoring. If you want full PostgreSQL management and tracking, you should look towards a dedicated DigitalOcean database server.
To get the automatically-configured startup script for your machine, you need to type this command:
Primarily, we need to write your server application. It’ll be straightforward; the main thing is to understand how it works.
Let’s create an ‘app’ folder in the root of your /var/www/appname folder from where your application will be launched. This is necessary for all your files with environment settings, pm2 setting file, etc. to be located at the root. This is how regular users of your application will not be able to reach them.
Now let’s write the code of the simplest application in Node.js:
Then, add the configuration file for pm2 to /var/www/appname.com. In this example, I used Javascript formatting with ecosystem.config.js name:
You can start your application via:
Let’s change your Nginx configuration a little to use proxying. We’ll remove the line that was in the block with the root location and replace it with the proxying settings.
Now all your requests will be redirected to port 3000, and the result of your script will be displayed in the browser.
To Wrap up
In this article, we’ve managed to go through critical steps in setting up the DigitalOcean server, including installing Node.js, PostgreSQL, Nginx, and PM2. However, this isn’t an ultimate list of steps. To simplify the article, I deliberately omitted some points. For example, I should have also mentioned an important point is not to work with the server directly under the root user.
Imagine you set up DigitalOcean installing Postgres and set up DigitalOcean installing Node. Now, to make the configuration even cooler, you may study other articles on setting up secure access to the database and droplet and put this experience together. Of course, it’s worth remembering that progress doesn’t stand still. So, it’s likely that this article will become irrelevant in some time, but I’m sure it won’t happen very soon.In the future, I plan to write about how to deploy an application to DigitalOcean server. DigitalOcean platform is a quick tool allowing you to deploy applications. Indeed, there are many ways to deploy a Node.js app. But I’ll try to show you how to rapidly create, deploy, handle, and scale resilient and scalable web apps. Monitor Keenethics blog to be among the first to read our new articles.
I will be happy to help with your task. I have many years of experience with Node.js development, and I will be willing to jumpstart your application.